Wednesday, 15 April 2009

Rubix Cube Solution PART 5 POSITION AND COLOUR ALIGN ALL REMAINING OUT OF PLACE MIDDLE-EDGE PIECES

THE RUBIX CUBE SOLUTION CONTINUED

PART 5 – POSITION AND COLOUR ALIGN ALL REMAINING OUT OF PLACE MIDDLE-EDGE PIECES, CONTINUED FROM (PART 4)

New Orientation

Turn the whole cube so that the 2 solved sides appear on the left and right sides. See figure 24 below.

Keep this new orientation fixed, and turn just the centre up and away until all 4 remaining centre squares fall into correct colour alignment as in figure 24. Note: Blue on the left side.


At this point, you will find one of five things will happen:

Case 1 –Four middle-edge pieces out of place and not colour aligned. Use process (A) on the following page twice.

Case 2 – Three middle-edge pieces out of place and not colour aligned. Use process (A).

Case 3 – Four middle-edge pieces in position but not colour aligned. Use process (B) below twice.

Case 4 – Three middle-edge pieces out of place and one piece in position but not colour aligned. Use process (A) then process (B).

Case 5 – Two middle-edge pieces in position but not colour aligned. Use process (B).

A. Process A

The goal of Process (A) is to place all remaining unsolved middle-edge pieces into their correct positions.

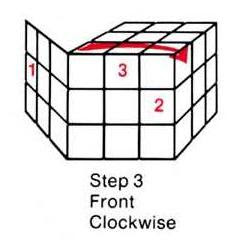
The four step procedure outlined below will move three middle-edge sub-cubes, causing them to exchange their positions with each other, without disturbing other sub-cubes. Figure 25 shows the three side sub-cubes that will exchange positions. The position exchange occurs as follows: the side sub-cube marked 1 will move to the position occupied by side sub-cube marked 2; the side sub-cube marked 2 will move to the position marked 3; and the side sub-cube marked 3 will move to the position marked 1.


Now check all the remaining out of place middle-edge pieces and pick 3 that will fall into correct place if exchanged.

Remember; first find the 3 out of place middle-edge cubes that will fall into correct position if they are exchanged in the manner below:

Be careful to maintain the starting orientation when using the procedure, hold both solved outside thirds firmly in steps 1 and 3.


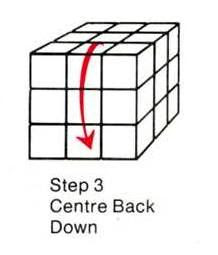


Repeat Process (A) steps 1-4 above until either the puzzle is solved OR you find you have left one pair of middle-edge pieces that are in position but not colour aligned. To solve this last pair go on and do process (B) steps 1-12 below.

If you find you are in Case 4, you will have 2 pairs of middle-edge pieces in position but not colour aligned as in figure 26A. Process (B) will solve them one pair at a times.


B. Process B

This 12 step process is known as Rubik’s Manoeuvre after Erno Rubik, the inventor of the cube.

Before you run Process (B), the 2 middle-edge pieces whose colours are to be flipped must be opposite each other on top of the cube as shown in figure 26A.


Repeat Rubik’s 12 step process if you have another pair in position that needs to be colour aligned.

Now you have solved the cube – Congratulations, you’re a CUBIST! Mix it up and start again.

Tuesday, 14 April 2009

Rubix Cube Solution PART 4 SOLVE TWO SIDES OF THE CUBE.

THE RUBIX CUBE SOLUTION CONTINUED

PART 4 – SOLVE TWO SIDES OF THE CUBE, CONTINUED FROM (PART 3)

The objective of this part is to solve 2 opposite side of the cube by using the guide piece to solve one bottom middle-edge piece at a time.

When you solved the first (blue) side you were instructed to leave one middle-edge piece out (unsolved). The missing piece will now act as a guide piece. See figure 20A below.

Turn the whole rubix cube so your blue reference colour appears on top. Keep blue on top and turn the whole cube again until the guide piece is facing you as in figure 20A below.


A. Choosing a Target Piece.

Now turn just the bottom row of the cube until an out of position bottom-edge piece appears directly below the guide piece as in figure 20B. This is the TARGET piece you will solve. Notice the two common colours of the 2 lower front corners. In the example in figure 20B the two common corner colours are yellow and orange. This means that the correct bottom middle-edge piece for this spot must be yellow and orange. In this case, the correct piece is located on the middle row.


At this point, choose a bottom middle-edge piece to solve by positioning it under the guide piece. Call this the TARGET piece.

Now check the 2 common colours of the corners on either side of the TARGET piece. Only the CORRECT MISSING piece will have these two colours. Find it! But remember to keep the blue reference colour on top and the guide piece facing you.

B. Locating and Storing CORRECT MISSING Piece.

The CORRECT MISSING piece will always be found in one of 3 places: (a) on the middle row as in figure 20, (b) on the bottom row out of place or (c) on top in the guide piece position.

Once you find the CORRECT MISSING piece you must store it in order to solve the TARGET piece. The CORRECT MISSING piece must be stored on the middle row in the storage position marked (X) in figure 21. How you store this piece depends on where it is located.


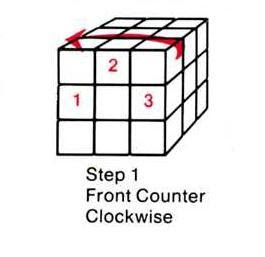
a. If you find the CORRECT MISSING piece on the middle row, then just turn the middle row until it falls into storage position (X). Then follow steps 1-3 or steps 1-3D below.


Note: Do not go on to step 3 unless the missing piece drops into correct colour alignment after step 2. If after step 2 the missing piece appears in position but out of colour alignment, then proceed to steps 3A-3D.


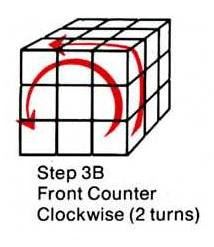
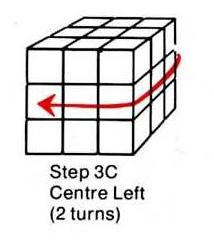
steps 3A-3D


b. If you find the CORRECT MISSING piece on the bottom, first, turn just the bottom row until the correct missing piece appears under the GUIDE piece. (This will move your TARGET piece out of position temporarily.) Then follow steps 1-3 below.


NOW TURN THE BOTTOM ROW UNTIL THE TARGET PIECE APPEARS UNDER THE GUIDE PIECE AGAIN.

Go back to section (B,a) above and follow steps 1-3 or 1-3D.

c. If the correct missing piece is the guide piece then follow steps 1-3 below:


Note: Do not go on to step 3 unless the missing piece drops into correct colour alignment after step 2. If after step 2, the missing piece appears in position but out of colour alignment, then go back to section (A) above and follow steps 3A-3D.


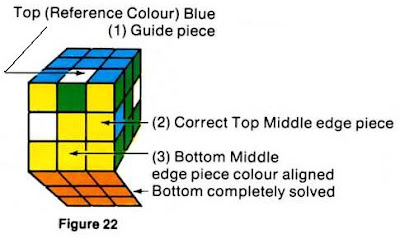
Solve all missing bottom edge pieces until you succeed in colour aligning the entire bottom of the cube. At this point, you will have the bottom solved and the (blue) top solved except for the guide piece. (see figure 22).

Now that the bottom is solved, you must solve the missing guide piece to complete the top. Find the correct top middle-edge piece. This piece can be found only in one of 2 places. (A) on the middle row or (B) already in position on top but not colour aligned.

(A) If you find the missing top middle-edge piece on the middle row then move it to position No.2 as in figure 22. In the example in figure 19 the correct missing top middle-edge piece is red and blue and it appears in position No. 2.


Once you move your correct top middle-edge piece to position No.2, follow steps 1-7.


(B) If your last top middle-edge piece (guide piece) is already in position but is not colour aligned, follow steps 1-7 THEN TURN THE CENTRE ROW RIGHT 90 DEGREES AND REPEAT STEPS 1-7 (see above) AGAIN.

Note: If after step 7 the guide piece falls into position but is not colour aligned, REPEAT STEPS 1-7, THEN TURN THE CENTRE ROW RIGHT 90 DEGREES AND REPEAT STEPS 1-7 AGAIN.

Now you should have both the top and bottom of the cube completely solved as shown in figure 23, with blue on top


NEXT UP PART 5 AND POSITION AND COLOUR ALL REMAINING PIECES

Saturday, 11 April 2009

Rubix Cube Solution PART 3 COLOUR ALIGN THE BOTTOM 4 CORNERS.

THE RUBIX CUBE SOLUTION CONTINUED

PART 3 COLOUR ALIGN THE BOTTOM 4 CORNERS, CONTINUED FROM (PART 2)

A. The objective of this 8 move process is to colour align the remaining corners. At this point, all 8 corners sub-cubes are in the correct position, but 4 or less of them are not colour aligned.

First, remember to keep the same orientation with the solved blue side at the back (away from you). This 8 step process rotates 3 of the four front corners on their axis. See figure 18. It keeps corners A, B and C in position but rotates the 3 colours on each corner. The process rotates the 3 corner sub-cubes A, B and C only, however, before you proceed you must establish the correct Initial Orientation. (See a, b and c below).

INITIAL ORIENTATION
a.If after you complete Part 2, you find you have one of the corner sub-cubes colour aligned, turn the whole cube so that that corner appears in the position marked (X). Do steps 1-8 below.

b.If you have two corners aligned, then turn the whole cube so that they fall in the position marked (A) and (B) or (A) and (C). Do steps 1-8 below.

c.If none of the front corners are colour aligned then it doesn’t matter. Do steps 1-8 below.


This process must be repeated several times (usually 2 to 4 times) until all 8 corners are colour aligned with reference to their centre cubes.

Check for colour aligned corners each time you do steps 1-8. then refer to a, b or c above before repeating the process. You will know that all 8 corners are in colour alignment when every side of the cube shows at least 5 squares of the same colour in an “X’ed” (or cross) pattern. See figure 19.


Remember, first check how many corners are colour aligned to make sure you are in the correct starting position. See a, b and c above. As you do the procedure, be sure to grasp the non-moving two thirds of the cube firmly to maintain your starting orientation (correct solved blue side in back.) Failing to do so will put you back to part 1.


After you do steps 1-8, check how many corners are colour aligned. Don’t worry if you had 2 corners colour aligned and you lost one or both because the last time you run the process only one corner should be colour aligned.

Now repeat steps 1-8 until all 8 corners become colour aligned as in figure 19 above.

DO NOT proceed to Part 4 unless one side, eight corners and six centres are in their solved condition. (In correct position and also colour aligned).


NEXT UP PART 4 AND SOLVING TWO SIDES OF THE CUBE