PART 4 – SOLVE TWO SIDES OF THE CUBE, CONTINUED FROM (PART 3)
The objective of this part is to solve 2 opposite side of the cube by using the guide piece to solve one bottom middle-edge piece at a time.
When you solved the first (blue) side you were instructed to leave one middle-edge piece out (unsolved). The missing piece will now act as a guide piece. See figure 20A below.
Turn the whole rubix cube so your blue reference colour appears on top. Keep blue on top and turn the whole cube again until the guide piece is facing you as in figure 20A below.

A. Choosing a Target Piece.
Now turn just the bottom row of the cube until an out of position bottom-edge piece appears directly below the guide piece as in figure 20B. This is the TARGET piece you will solve. Notice the two common colours of the 2 lower front corners. In the example in figure 20B the two common corner colours are yellow and orange. This means that the correct bottom middle-edge piece for this spot must be yellow and orange. In this case, the correct piece is located on the middle row.

At this point, choose a bottom middle-edge piece to solve by positioning it under the guide piece. Call this the TARGET piece.
Now check the 2 common colours of the corners on either side of the TARGET piece. Only the CORRECT MISSING piece will have these two colours. Find it! But remember to keep the blue reference colour on top and the guide piece facing you.
B. Locating and Storing CORRECT MISSING Piece.
The CORRECT MISSING piece will always be found in one of 3 places: (a) on the middle row as in figure 20, (b) on the bottom row out of place or (c) on top in the guide piece position.
Once you find the CORRECT MISSING piece you must store it in order to solve the TARGET piece. The CORRECT MISSING piece must be stored on the middle row in the storage position marked (X) in figure 21. How you store this piece depends on where it is located.

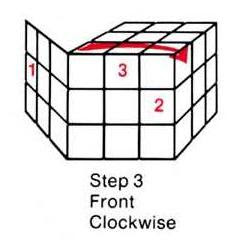
a. If you find the CORRECT MISSING piece on the middle row, then just turn the middle row until it falls into storage position (X). Then follow steps 1-3 or steps 1-3D below.


Note: Do not go on to step 3 unless the missing piece drops into correct colour alignment after step 2. If after step 2 the missing piece appears in position but out of colour alignment, then proceed to steps 3A-3D.

steps 3A-3D

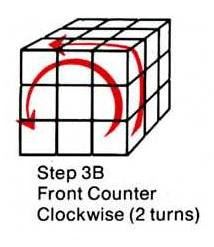
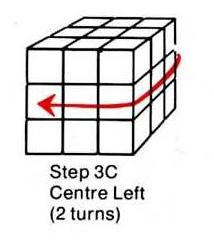

b. If you find the CORRECT MISSING piece on the bottom, first, turn just the bottom row until the correct missing piece appears under the GUIDE piece. (This will move your TARGET piece out of position temporarily.) Then follow steps 1-3 below.


NOW TURN THE BOTTOM ROW UNTIL THE TARGET PIECE APPEARS UNDER THE GUIDE PIECE AGAIN.
Go back to section (B,a) above and follow steps 1-3 or 1-3D.
c. If the correct missing piece is the guide piece then follow steps 1-3 below:


Note: Do not go on to step 3 unless the missing piece drops into correct colour alignment after step 2. If after step 2, the missing piece appears in position but out of colour alignment, then go back to section (A) above and follow steps 3A-3D.

Solve all missing bottom edge pieces until you succeed in colour aligning the entire bottom of the cube. At this point, you will have the bottom solved and the (blue) top solved except for the guide piece. (see figure 22).
Now that the bottom is solved, you must solve the missing guide piece to complete the top. Find the correct top middle-edge piece. This piece can be found only in one of 2 places. (A) on the middle row or (B) already in position on top but not colour aligned.
(A) If you find the missing top middle-edge piece on the middle row then move it to position No.2 as in figure 22. In the example in figure 19 the correct missing top middle-edge piece is red and blue and it appears in position No. 2.
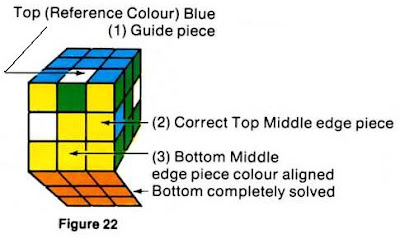
Once you move your correct top middle-edge piece to position No.2, follow steps 1-7.
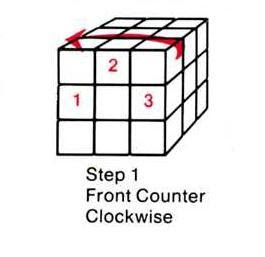



(B) If your last top middle-edge piece (guide piece) is already in position but is not colour aligned, follow steps 1-7 THEN TURN THE CENTRE ROW RIGHT 90 DEGREES AND REPEAT STEPS 1-7 (see above) AGAIN.
Note: If after step 7 the guide piece falls into position but is not colour aligned, REPEAT STEPS 1-7, THEN TURN THE CENTRE ROW RIGHT 90 DEGREES AND REPEAT STEPS 1-7 AGAIN.
Now you should have both the top and bottom of the cube completely solved as shown in figure 23, with blue on top

NEXT UP PART 5 AND POSITION AND COLOUR ALL REMAINING PIECES


No comments:
Post a Comment